[dbp_user_notification_preferences]

This shortcode displays options for the current logged in user to configure new user and lead notifications if enabled through the admin panel.

   – `buttonclass`: Ability to add a class to this shortcode’s button.

   – `inputclass`: Ability to add a class to this shortcode’s input fields.

   – `newleadtext`: Ability to add change the text for the New Lead notifications.

   – `newusertext`: Ability to add change the text for the New User notifications.

   – `buttontext`: Ability to change the text for this shortcode’s button.

Setting up AWeber Integration

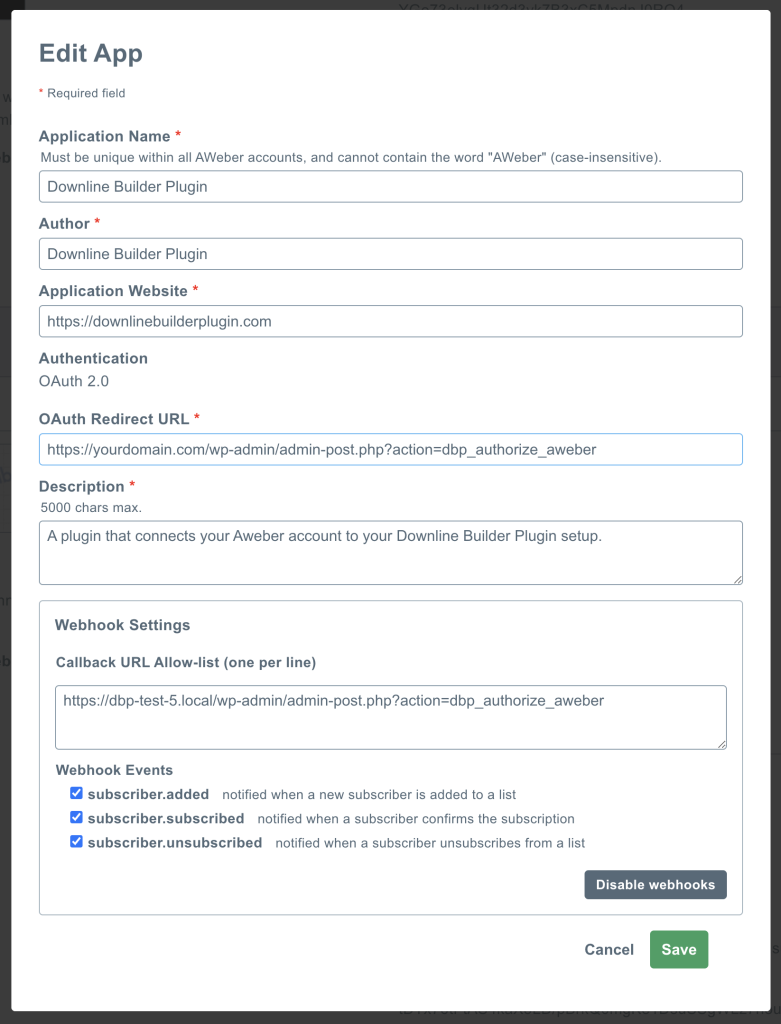
In this tutorial, we will guide you through the process of creating an AWeber app and configuring it for Downline Builder Plugin. By following these steps, you’ll be able to seamlessly integrate your AWeber email lists with your WordPress website.

Note: Before proceeding, make sure you have an AWeber account and access to your WordPress dashboard, and have the Downline Builder Plugin installed.

Part 1: Creating an AWeber App

Step 1: Access the AWeber Developer Portal

  • Open your web browser and go to the AWeber Developer Portal at https://labs.aweber.com/.
  • Log in to your AWeber account using your credentials.

Step 2: Navigate to “Manage Apps”

  • Within the developer portal, locate the “Manage Apps” section and click on “Create New App”.

Step 3: Provide App Details

  • Enter a name for your app in the designated field.
  • In the “Client Type” field, select “Confidential” to ensure the app’s credentials remain secure.

Step 4: Set Callback URL

  • For the “Callback URL”, enter the following URL: http://{yourdomain.com}/wp-admin/admin-post.php?action=dbp_authorize_aweber.
    (Replace {yourdomain.com} with your actual domain name.)
  • This URL is where AWeber will send authorization responses.

Step 5: Save App Settings and Retrieve Credentials

  • Save the app settings.
  • Take note of the “App Key” and “App Secret” values provided. You will need them for the WordPress setup.

Part 2: Configuring AWeber Integration in WordPress and Downline Builder Plugin

Step 1: Access the WordPress Dashboard

  • Open your web browser and log in to your WordPress dashboard using your credentials.

Step 2: Navigate to D.B. Plugin Settings

  • In the WordPress dashboard, locate and click on “D.B. Plugin”.
  • Click the “Settings” button.
  • Select the “Auto Responders” tab.

Step 3: Enable AWeber Integration

  • Look for the AWeber checkbox in the list of available integrations.
  • Enable AWeber integration by checking the box.
  • Click the “Save Changes” button.

Step 4: Enter AWeber App Credentials

  • Locate the “App Key” and “App Secret” fields.
  • Enter the respective values obtained from the AWeber Developer Portal.
  • Click the “Save Changes” button.

Step 5: Link Your AWeber Account

  • Locate and click the “Link Account” button.
  • Follow the provided instructions to authorize the connection between WordPress and AWeber.

Step 6: Fetch and Select AWeber Email List

  • Locate the “Get Lists” button and click on it.
  • WordPress will fetch your AWeber email lists.
  • From the drop-down menu, select the desired list to which leads from your website will be added.

Congratulations! You have successfully set up AWeber integration within WordPress. From now on, whenever a lead is added to your website, it will also be added to your selected AWeber email list. This integration allows you to manage and communicate with your subscribers seamlessly.

Setting up GetResponse Integration

This tutorial will guide you through the process of integrating GetResponse with the DBP (Database Plugin) on your website. By following these steps, you’ll be able to seamlessly connect your GetResponse account and manage your leads and users efficiently.

Note: Before proceeding, make sure you have a GetResponse account and access to your website’s DBP plugin.

Step 1: Create a GetResponse Account

  • If you don’t have a GetResponse account, visit their website (https://www.getresponse.com/) and sign up for an account. Follow the provided instructions to complete the registration process.

Step 2: Set Up a GetResponse App

  • Log in to your GetResponse account.
  • Navigate to the settings or account section.
  • Look for the option to create a new app or integration.
  • Follow the steps to create a new app, providing any required details.

Step 3: Save Your App Credentials

  • After setting up the app, make a note of your app credentials, such as the app ID and secret. These credentials will be used later during the integration process. Keep this information handy.

Step 4: Enable GetResponse Integration in DBP Plugin

  • Access your website’s DBP plugin settings in the WordPress dashboard.
  • Look for the integrations tab or section related to email service providers.
  • Locate the option to enable GetResponse integration.
  • Check the box or toggle the switch to enable the integration.
  • Remember to save the changes before proceeding.

Step 5: Connect Your GetResponse Account

  • After enabling the GetResponse integration, a button should appear labeled “Connect GetResponse Account” or similar.
  • Click on this button to initiate the connection process.
  • You may be redirected to the GetResponse website for authorization.
  • Follow the instructions provided to grant access to your GetResponse account.

After linking your account, you will be redirected back to the integrations tab within the DBP plugin settings. Here, you will find a new field related to GetResponse.

Step 6: Choose Your Lists

  • In the DBP plugin settings, locate the field where you can select the lists you want to use for your leads and users.
  • It is recommended to have separate lists for better organization, but you can choose to use the same list if you prefer.
  • Select the desired lists from the available options.

Step 7: Save Your Changes

  • Once you have chosen your lists, click on the “Save Changes” button or similar to apply the configurations.
  • The DBP plugin will save the integration settings and connect to your selected GetResponse lists.

Congratulations! You have successfully installed and configured GetResponse on your DBP plugin. Now, you can effectively manage your leads and users while utilizing the features and capabilities provided by GetResponse.

Backup Before Upgrading WordPress Core, Themes, and Plugins (Including Downline Builder Plugin)

Upgrading your WordPress core, themes, and plugins is essential for security, bug fixes, and new features. However, before performing any updates, it’s crucial to create a backup to ensure the safety of your website data. In this tutorial, we will guide you through the process of making a backup before upgrading, with a specific focus on Downline Builder Plugin.

Step 1: Evaluate Your Backup Options

Before proceeding, consider the backup options available to you. There are several methods you can choose from, such as using a backup plugin, your hosting provider’s backup service, or manually creating backups. Assess your specific requirements, resources, and preferences to determine the most suitable backup solution for your website.

Step 2: Backup the WordPress Database

The WordPress database contains crucial information such as posts, pages, settings, and plugin data. To back up your database:

  1. Access your hosting control panel or use a database management tool like phpMyAdmin.
  2. Locate your WordPress database and select the option to export or create a backup.
  3. Choose the export method (e.g., SQL format), select all tables, and click the “Export” or “Create Backup” button.
  4. Save the exported file to your computer.

Step 3: Backup the WordPress Files

In addition to the database, it’s important to backup your WordPress files, including themes, plugins, and uploads. To do this:

  1. Connect to your website via FTP or use your hosting provider’s file manager.
  2. Navigate to the root directory of your WordPress installation.
  3. Select all the files and folders, right-click, and choose the option to compress or zip them.
  4. Save the compressed file to your computer.

Step 4: Backup Downline Builder Plugin-Specific Data

If you want to ensure that your Downline Builder Plugin data is backed up separately, follow these additional steps:

  1. Access your WordPress dashboard and go to “Downline Builder Plugin” in the menu.
  2. Depending on the plugin, locate the “Export” or “Backup” option.
  3. Click on the option and follow the instructions to generate a backup file containing your Downline Builder Plugin data.
  4. Save the backup file to your computer.

Step 5: Store the Backups Securely

Once you have created the backups, it’s crucial to store them securely to prevent data loss or unauthorized access. Consider the following best practices:

  1. Save the backup files to multiple locations, such as your computer, external storage devices, or cloud storage services.
  2. Use strong passwords and encryption for any cloud storage or online backup solutions.
  3. Regularly test your backups by restoring them to ensure they are functioning correctly.

By following this tutorial and creating backups before upgrading your WordPress core, themes, and plugins, including Downline Builder Plugin, you can safeguard your website data and have peace of mind during the update process. Remember to choose a backup solution that suits your needs, follow the recommended steps to backup the WordPress database and files, and securely store your backups. With proper backups in place, you can confidently proceed with upgrades, knowing that your valuable data is protected.

[dbp_referral_leaderboard]

This shortcode displays a leaderboard of users based on their referral count. The following attributes can be used:

   – `exclude_usernames`: A comma-separated list of usernames to exclude from the leaderboard.

   – `time_period`: Defines the time period for counting referrals. Accepted values are “lifetime”, “year”, “month”, or “day” (default is “lifetime”).

   – `limit`: Sets the maximum number of users to display on the leaderboard (default is 10).

[dbp_registration_form]

This shortcode displays a registration form for new users. The following attributes can be used:

   – `inputclass`: Sets the CSS class for the input fields in the form.

   – `buttonclass`: Sets the CSS class for the submit button.

   – `buttontext`: Sets the text displayed on the submit button (default is “Register”).

   – `redirect`: Sets the URL to redirect users to after successful registration (default is the home URL).

[dbp_breadcrumbs]

This shortcode generates and displays breadcrumbs based on the current page or post. It has one attribute:

   – `separator`: Defines the character or string used to separate the breadcrumbs (default is `»`).

[dbp_lead_export]

This shortcode exports the leads associated with the current user to a CSV file. There are no attributes for this shortcode.

[dbp_edit_user_profile]

This shortcode displays a form for users to edit their profile information, including their first name, last name, website URL, and biography. The following attributes can be used:

   – `savedclass`: Sets the CSS class for the success message displayed after updating the profile.

   – `buttonclass`: Sets the CSS class for the submit button.

   – `inputclass`: Sets the CSS class for the input fields in the form.

[dbp_gravatar]

This shortcode displays the Gravatar image for the current user’s email address along with a notification and a link to Gravatar.com to update the Gravatar. There are no attributes for this shortcode.