In this tutorial, we will guide you through the process of creating an AWeber app and configuring it for Downline Builder Plugin. By following these steps, you’ll be able to seamlessly integrate your AWeber email lists with your WordPress website.
Note: Before proceeding, make sure you have an AWeber account and access to your WordPress dashboard, and have the Downline Builder Plugin installed.
Part 1: Creating an AWeber App
Step 1: Access the AWeber Developer Portal
- Open your web browser and go to the AWeber Developer Portal at https://labs.aweber.com/.
- Log in to your AWeber account using your credentials.
Step 2: Navigate to “Manage Apps”
- Within the developer portal, locate the “Manage Apps” section and click on “Create New App”.
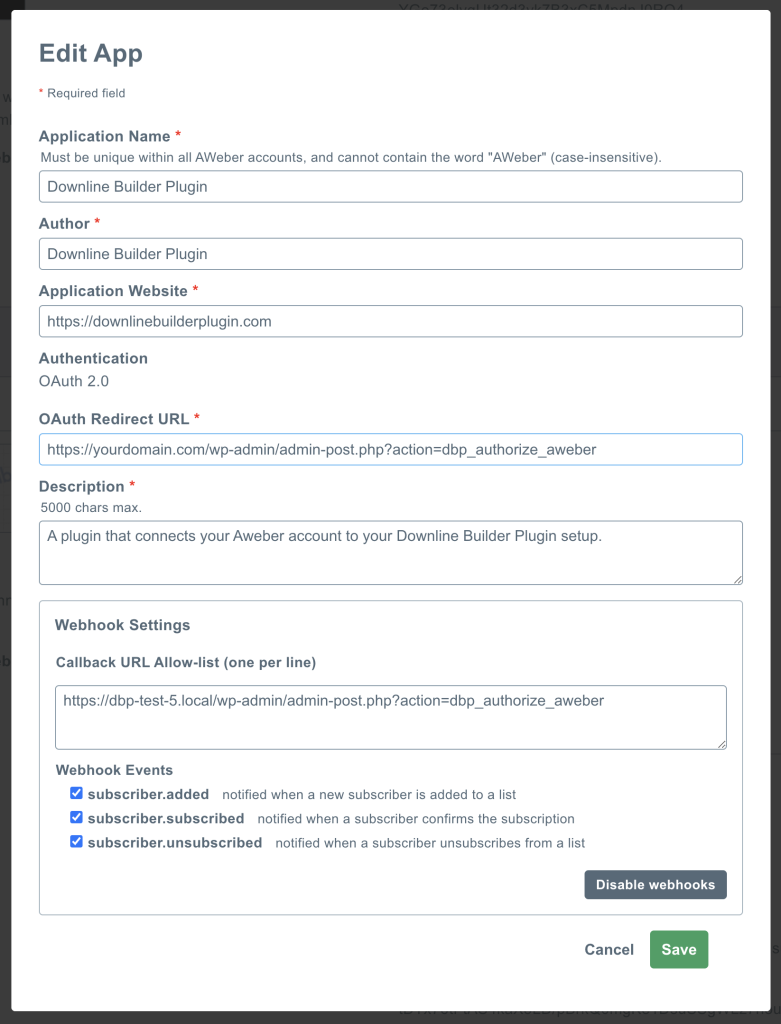
Step 3: Provide App Details
- Enter a name for your app in the designated field.
- In the “Client Type” field, select “Confidential” to ensure the app’s credentials remain secure.
Step 4: Set Callback URL
- For the “Callback URL”, enter the following URL: http://{yourdomain.com}/wp-admin/admin-post.php?action=dbp_authorize_aweber.
(Replace {yourdomain.com} with your actual domain name.) - This URL is where AWeber will send authorization responses.

Step 5: Save App Settings and Retrieve Credentials
- Save the app settings.
- Take note of the “App Key” and “App Secret” values provided. You will need them for the WordPress setup.
Part 2: Configuring AWeber Integration in WordPress and Downline Builder Plugin
Step 1: Access the WordPress Dashboard
- Open your web browser and log in to your WordPress dashboard using your credentials.
Step 2: Navigate to D.B. Plugin Settings
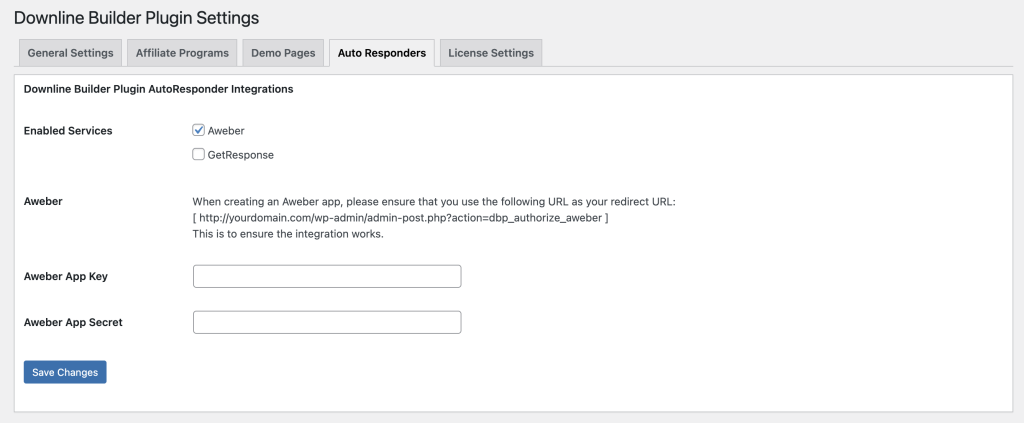
- In the WordPress dashboard, locate and click on “D.B. Plugin”.
- Click the “Settings” button.
- Select the “Auto Responders” tab.
Step 3: Enable AWeber Integration
- Look for the AWeber checkbox in the list of available integrations.
- Enable AWeber integration by checking the box.
- Click the “Save Changes” button.
Step 4: Enter AWeber App Credentials
- Locate the “App Key” and “App Secret” fields.
- Enter the respective values obtained from the AWeber Developer Portal.
- Click the “Save Changes” button.
Step 5: Link Your AWeber Account
- Locate and click the “Link Account” button.
- Follow the provided instructions to authorize the connection between WordPress and AWeber.
Step 6: Fetch and Select AWeber Email List
- Locate the “Get Lists” button and click on it.
- WordPress will fetch your AWeber email lists.
- From the drop-down menu, select the desired list to which leads from your website will be added.

Congratulations! You have successfully set up AWeber integration within WordPress. From now on, whenever a lead is added to your website, it will also be added to your selected AWeber email list. This integration allows you to manage and communicate with your subscribers seamlessly.
